Return to flip book view
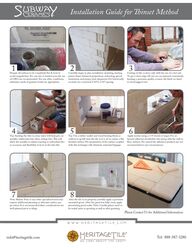
info@heritagetile.comTel: 888-387-3280www.heritagetile.comInstallation Guide for inset Method 1Prepare all surfaces to be completely at & level to avoid irregularities. For any wet or humid areas the use of CBUs are recommended. For any other conditions, substrates made of gypsum board are appropriate. 4Tip: Soaking the tiles in clean water will help give an installer additional time when setting tiles. is will allow the installer to adjust coursing or individual tiles as necessary and exibility to beat-in the tiles at. 7Note: Radius Trim or any other specialized trim may require additional planning or alternate surface pre-pa-ration. It is recommended these considerations are well planned prior to tiling. 2Carefully begin to plan installation including starting points (base), balanced proportions, indicating special treatments, and proper joint alignment. For historically accurate use a nominal 1/32”to 1/16” spacing. 5Tip: Use a rubber mallet and wood beating block as cushion to gently beat the tile as it is set to ensure a at nished surface. Pre-preparation of the surface coupled with this technique will eliminate unwanted lippage. 8After the tile is set properly, carefully apply a premium unsanded grout. After the grout has fully cured, apply penetrating grout sealer. Note: Crackle glazes need to be sealed prior to grouting as well as after grouting. 3Cutting of tiles is done only with the use of a wet saw. To get a clean edge o cuts, we recommend consistently keeping a premium quality ceramic tile blade on hand to avoid jagged cuts. 6Apply mortar using a 1/4” trowel or larger. For en-hanced adhesion, backbutter tiles along with the wall or oor surfaces. Pre-mixed tile adhesives products are not recommended in any circumstances.Please Contact Us for Additional Information.